


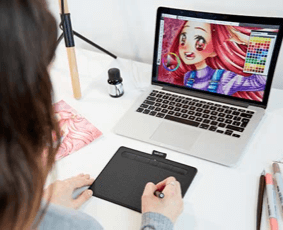
Pen tablets
Sketch, draw and edit images with a responsive pad, a precise pen and see your creations appear on screen.


This is going to be the first of a few tutorials. In this one, we will do an overview on how to draw a head.
In this first episode, before we discuss features like eyes and nose etc., we will focus on the shape of the head. The episode is a great place to start if you are a beginner looking to explore different aspects of drawing a head shape, the features of a head, and the head shape from different angles. More advanced artists will also find some really great tricks to getting proportions and perspectives spot on. Let's get started!
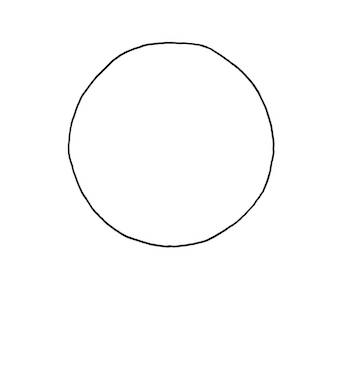
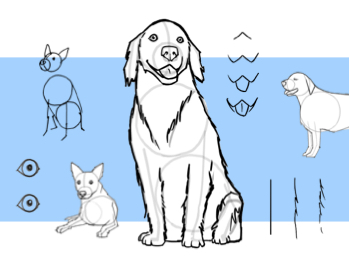
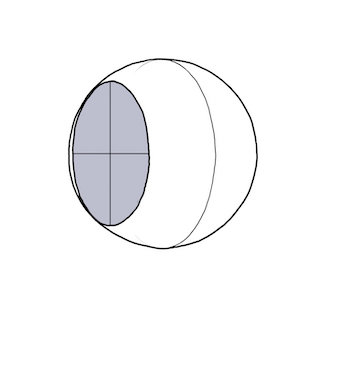
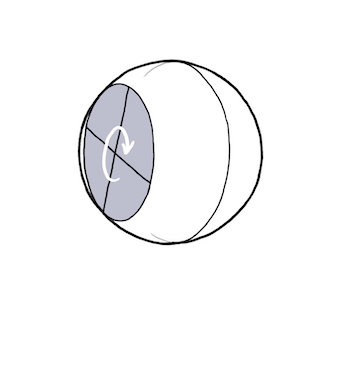
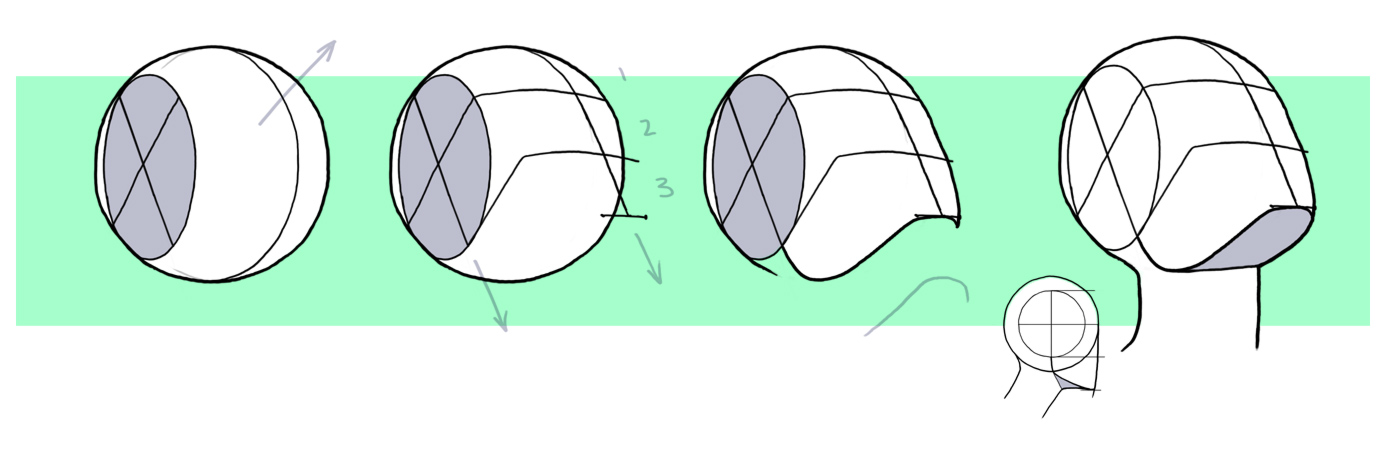
First of all – and you may be expecting this if you are familiar with the other tutorials - we will start with a circle. The circle obviously stands for a sphere. It only looks like a circle because we draw in 2 dimensions.
It’s one of the principal shapes when drawing anything organic. Take a look at the previous tutorials such as How to Draw A Dog to see another example of the circle in action.
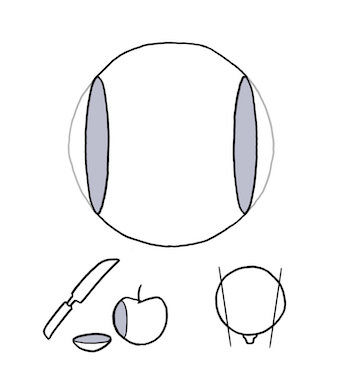
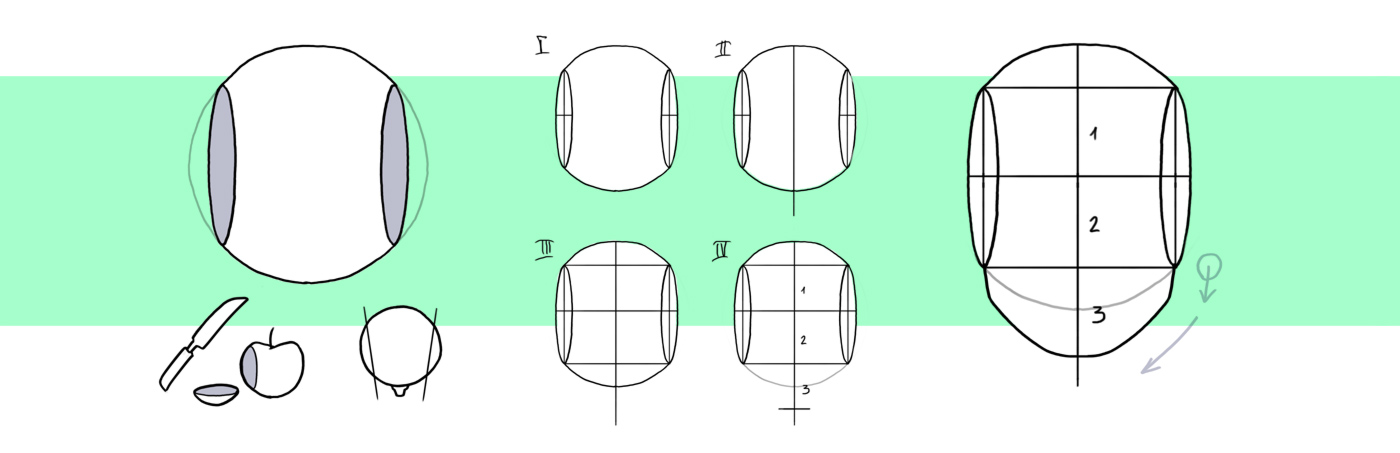
From the sphere we will cut away two slices - one off each side of the sphere.
Try imagining an apple. If we cut one slice from this apple, an elliptical shape appears. It will be the same with our cut-out area. You’ll notice that the principle of the sphere or circle is still at work here, and we are modifying it to suit the basic head shape.
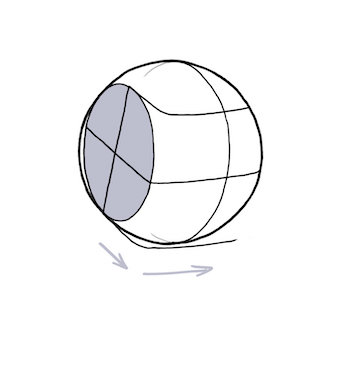
One more thing to keep in mind is that if you view the head from above, our 2 cuts will not be exactly parallel, but slightly narrower towards the nose. That’s why when we look at the face from the front, we can see the 2 elliptical areas.
The height of the cuts should be about two thirds the height of the whole sphere.
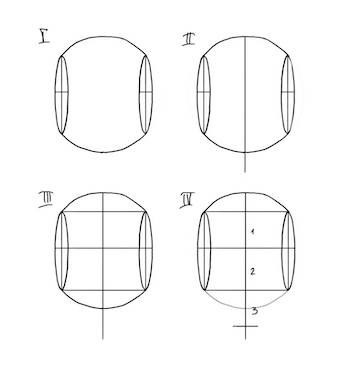
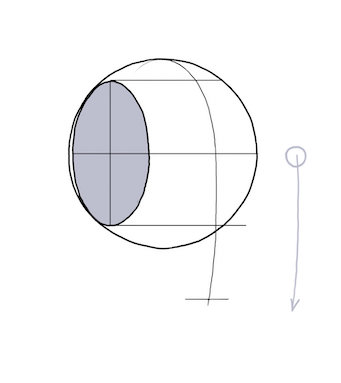
The next thing we need is a cross on each cut-out area on both sides. This will be especially important later when we start turning the head. The crosses will act as a guide to creating the perspective we want regardless of the head angle.
We also need a centerline for symmetry. Again, this will act as a guide when we start adding the basic features of the head shape.
We should now connect the edges of our cut-out areas in order to get a pair of subdivisions.
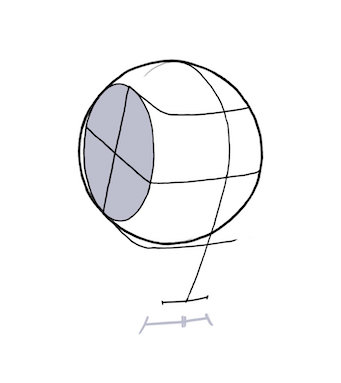
To get the final height of the face we only need to add one more of these subdivision-heights below. Now we have the most important guidelines for the face. And, now that we have these key guidelines, let’s look at the different ways we can use them.
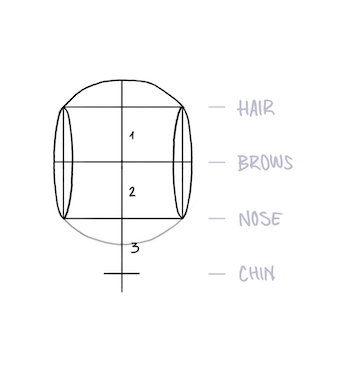
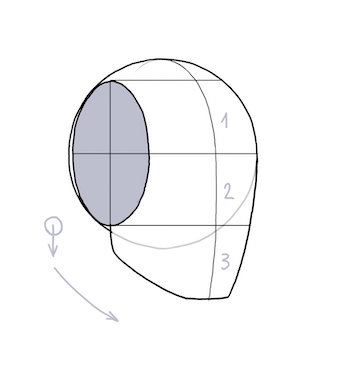
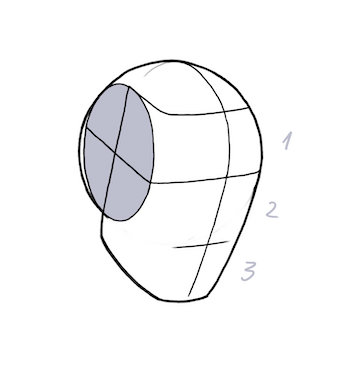
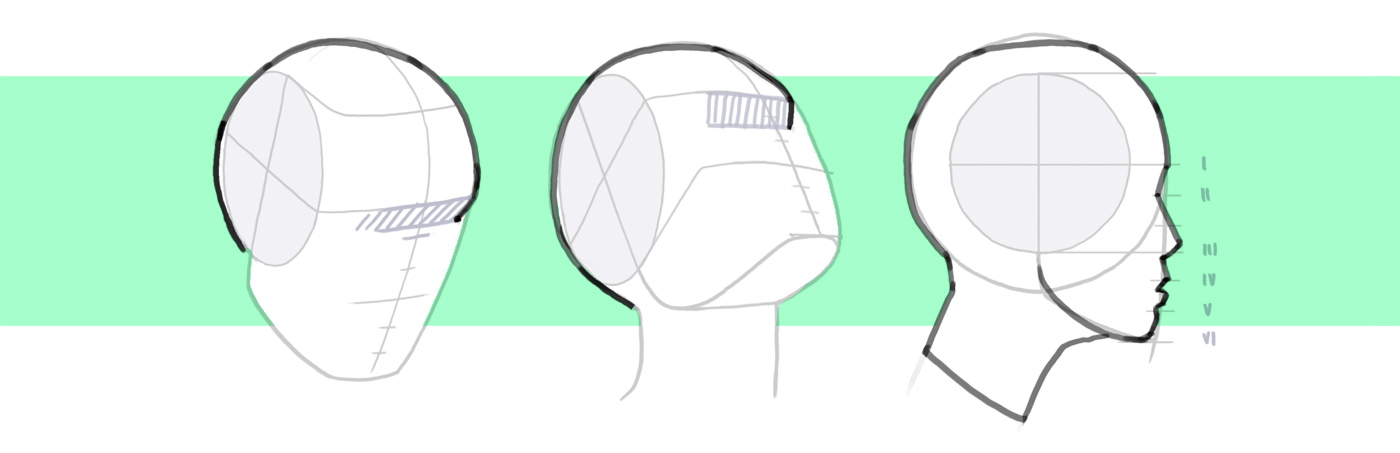
The upper line is the hairline. This is the line where the hair starts – if there is hair! But, even if you are drawing a bald head, the notional hairline is useful to keep in mind when considering the proportions of the head shape’s features. An example of this is the second line: this is the brow line. This is roughly the line at which the eyebrows should lie.
The third line is the nose line. Specifically, this is the bottom of the nose. And the last guideline is the chin. At this height we should define the chin.
By the way: Every face is different. The spacing between the 4 guidelines also tends to vary from face to face. In extremely rare cases, all the spacing may turn out to be exactly the same. Try experimenting with the spacing. You can push it the extremes if you want. Giant chins always are fun! However, in this tutorial, let's stick to the basics.
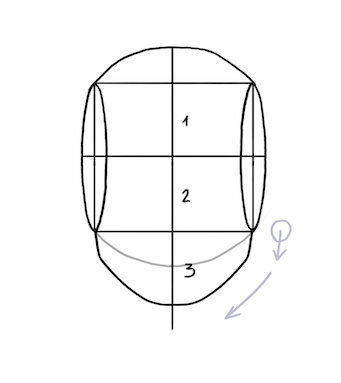
Now I can start from the lowest points of the cut-out areas. Do not worry about finding an exact point at the bottom of the cut out areas because we can actually start slightly below them depending on how strong we want the jaw to be. Next, connect it to the chin. And that is already the whole head shape – done! Notice that the original guidelines that we used help control the proportions. Based on the the guidelines, we can make decisions about things like how strong the jawline should be, how large the chin, and so on.
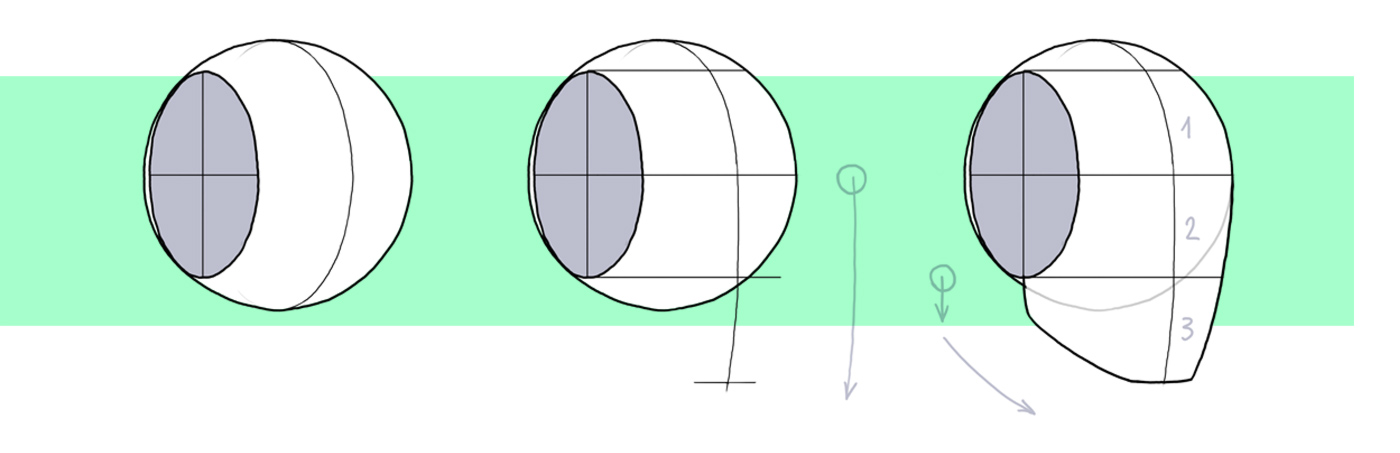
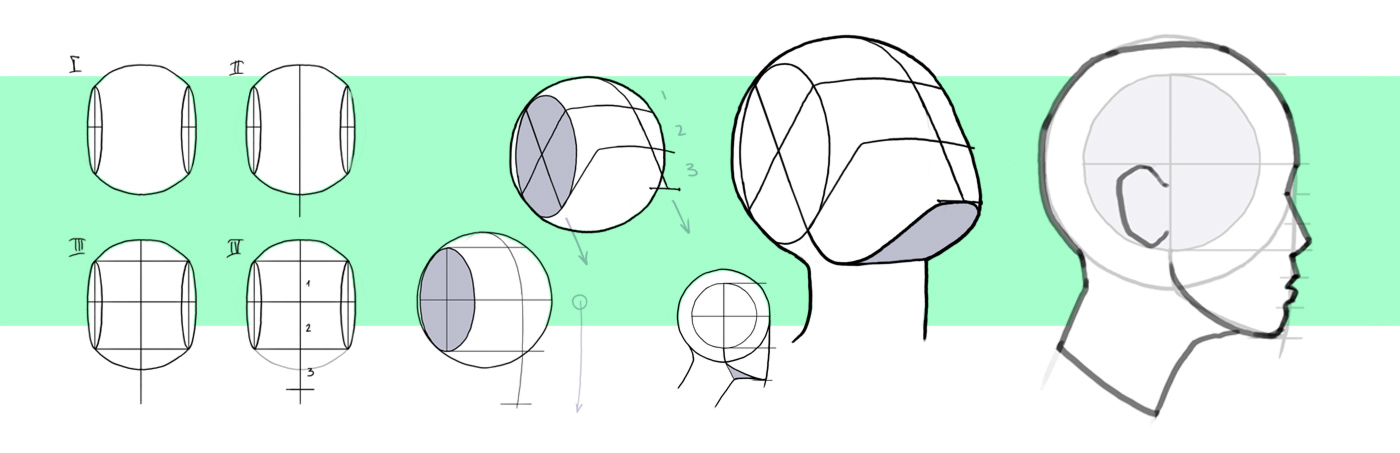
Let’s rotate the head a bit to the right to see how to construct the profile. With the head turned to the right, we will see only one of the cut-areas, and it will appear wider than before. The center line is not a straight line anymore. Rather, it forms an ellipse.
From the point at the brow line, we will not follow the sphere anymore. Instead, go more or less straight down. Remember, the head is rotated to the right, so going straight down only refers to our process, not the figure itself.
In order to form a softer, more feminine chin, you can go slightly inwards of the centerline. If you want to make a squarer, more traditionally masculine chin, go more straight or even slightly outwards.
We can generate our 3 areas again to be able to define the chin line. Finally, connect the chin to the jaw. And there we have it: the completed form.
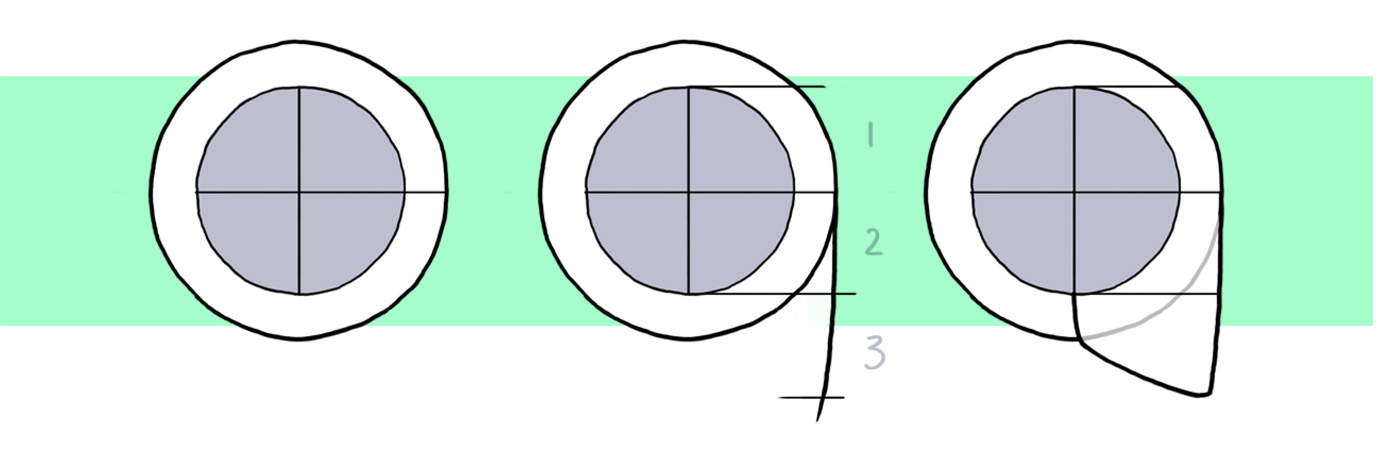

Let's take a look at a profile view. This means the cut-out area appears as a perfect circle. This perfect circle happens not because it is the natural shape of the side of the head. Rather, think of it again as a guideline for viewing the features of the head-sphere from the side.

The center line will move to the edge of the face. And we can draw in the 3 guide lines again. And then, one more for the chin. By this point we are pretty used to this chin line – and that from a few different angles now.

Just connect the chin to the jaw like we did before with a small jaw line straight down from the cut-out area. This creates a rather elegant connection to the chin. And, now our profile view is done. Do not worry that it looks like a football helmet at this point. Remember we are creating a shape as part of a process to form a fully organic human head.

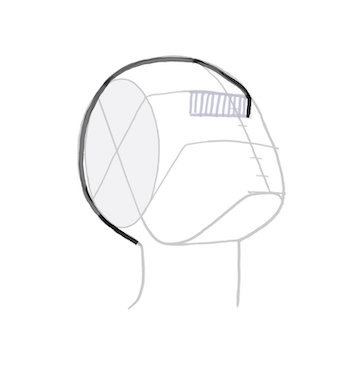
Let's move on to a slightly more complicated perspective. Turn the head to the right and downwards. Our sphere always stays the same - it doesn't matter where we turn a sphere, it will always be a sphere. And, the same is true for the cut-out areas. In the end, these are only there let us know that the head is turned to the right. In order to orient the head downwards, we just need to turn this cross.
Now that the cross is turned downwards, not only does the horizontal line change, but also the vertical line.
To draw in the guidelines, imagine a corner between front and side of the head. You can find this brow-line corner on your own head by touching the very outer edge of your own eyebrow.
Of course, in the end it will not be a corner but more like a curve, because there are no really sharp corners in a face. That’s why we can immediately soften this corner a bit.

In order to continue the center line from the brow line, just go parallel to the vertical cross line of the cut-out area. Now the center line no longer goes straight down. It is actually angled to the left a bit because we have turned the head downwards and to the right. Keep in mind that we are viewing this head shape from above the left ear.
Pay close attention to the chin line here: it is a bit shorter on the right side than on the left because the head is turned to the right. Therefore, we end up seeing more of the chin on the left side. From this perspective, the right side of the chin is obscured by the rest of the head shape.
Connect the lines as we have done in the previous steps.
Let's move on to a slightly more complicated perspective. Turn the head to the right and downwards. Our sphere always stays the same - it doesn't matter where we turn a sphere, it will always be a sphere. And, the same is true for the cut-out areas. In the end, these are only there let us know that the head is turned to the right. In order to orient the head downwards, we just need to turn this cross.
Now that the cross is turned downwards, not only does the horizontal line change, but also the vertical line.
To draw in the guidelines, imagine a corner between front and side of the head. You can find this brow-line corner on your own head by touching the very outer edge of your own eyebrow.
Of course, in the end it will not be a corner but more like a curve, because there are no really sharp corners in a face. That’s why we can immediately soften this corner a bit.
In order to continue the center line from the brow line, just go parallel to the vertical cross line of the cut-out area. Now the center line no longer goes straight down. It is actually angled to the left a bit because we have turned the head downwards and to the right. Keep in mind that we are viewing this head shape from above the left ear.
Pay close attention to the chin line here: it is a bit shorter on the right side than on the left because the head is turned to the right. Therefore, we end up seeing more of the chin on the left side. From this perspective, the right side of the chin is obscured by the rest of the head shape.
Connect the lines as we have done in the previous steps.
Now for the view from below: the opposite happens with this eyebrow line because now much more of this plane under the eyebrows is visible. That's why we go much longer with this eyebrow valley line.
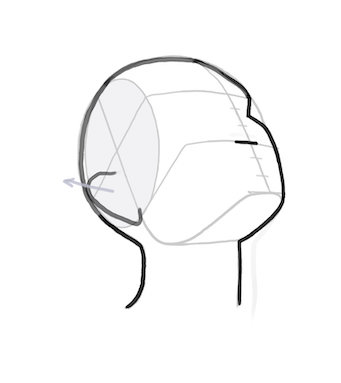
And here again something new happens with the ear because if we follow these guidelines for the ear as we did earlier, the ear looks like an ear painted onto an earless head. This is a problem of perspective - the ear is not flat to the head. Rather it stands out a bit away from the head. That's the reason, in this perspective, the ear goes a bit over the guideline.
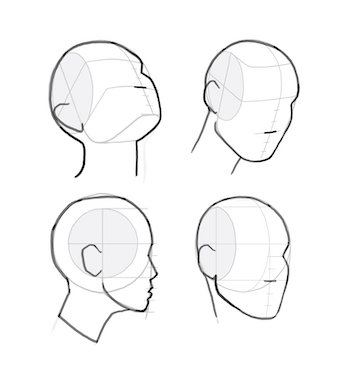
That is basically everything with regard to how to draw a head shape. Of course, you can draw from many more perspectives. But, these 4 perspectives show the whole principle fairly comprehensively. I hope this gives you an enjoyable overview of this method of constructing a head shape. I’ll see you soon in the next episode of this series. Happy painting!

Sketch, draw and edit images with a responsive pad, a precise pen and see your creations appear on screen.

Draw, design and create directly on a high resolution screen with a precise pen.

Wacom’s vision is to bring people and technology closer together through natural interface technologies. This has made it the world’s leading manufacturer of interactive pen tablets and displays as well as of digital styli and solutions for saving and processing digital signatures. The advanced technology of Wacom’s intuitive input devices has been used to create some of the most exciting digital art, films, special effects, fashion and designs around the world and provides business and home users with their leading interface technology to express their personality. Founded in 1983, Wacom is a global company based in Japan (Tokyo Stock Exchange 6727) with subsidiaries and affiliate offices around the world to support marketing and distribution in over 150 countries.