


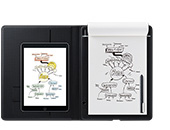


Pen tablets
Sketch, draw and edit images with a responsive pad, a precise pen and see your creations appear on screen.


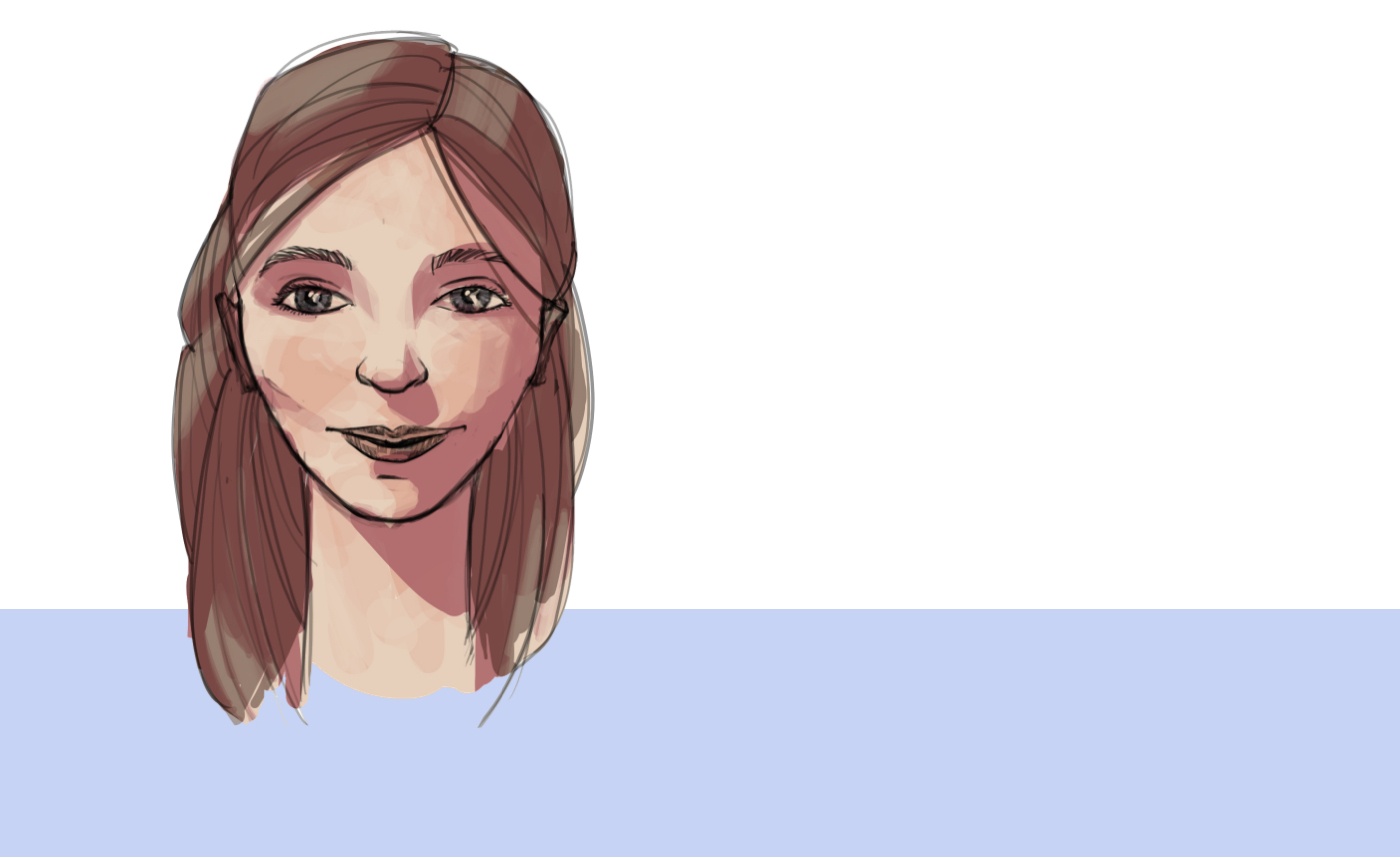
Welcome to a new Wacom sketch lesson. Today we will learn how to draw a woman’s face. This - as we all know - can be a beautiful sight and is also one of my own favorites. Of course, all faces look slightly different, depending on their origin, age, number of ears, etc., not to mention the style of each artist. Sometimes even the same face looks completely different in the morning than it does in the evening.
In this step-by-step guide we will learn some basic guidelines that portrait, caricature, comic and anime artists all over the world have been using for many years when painting realistic faces. Of course, these are not mandatory rules and every artist can adapt and reinterpret them to their own style. With a task as challenging as the female face, it can be tremendously helpful to practice and keep this guide in mind.
In this course we will draw a female face from our imagination and learn some essential tricks and techniques to make it look realistic. We will start by constructing the head shape, then add the features, and finally give the face some fine-tuning and color. I hope you find the course inspiring, and that you will be able to use this approach for yourself in the future.
This course is mainly aimed at beginners, but an experienced artist may discover something new too. I'm also going to talk about the workflow on the computer with a graphic tablet and the advantages of digital devices. However, you can follow the course with pen and paper as well.
I wish you a lot of fun while drawing and great results.
Table of contents
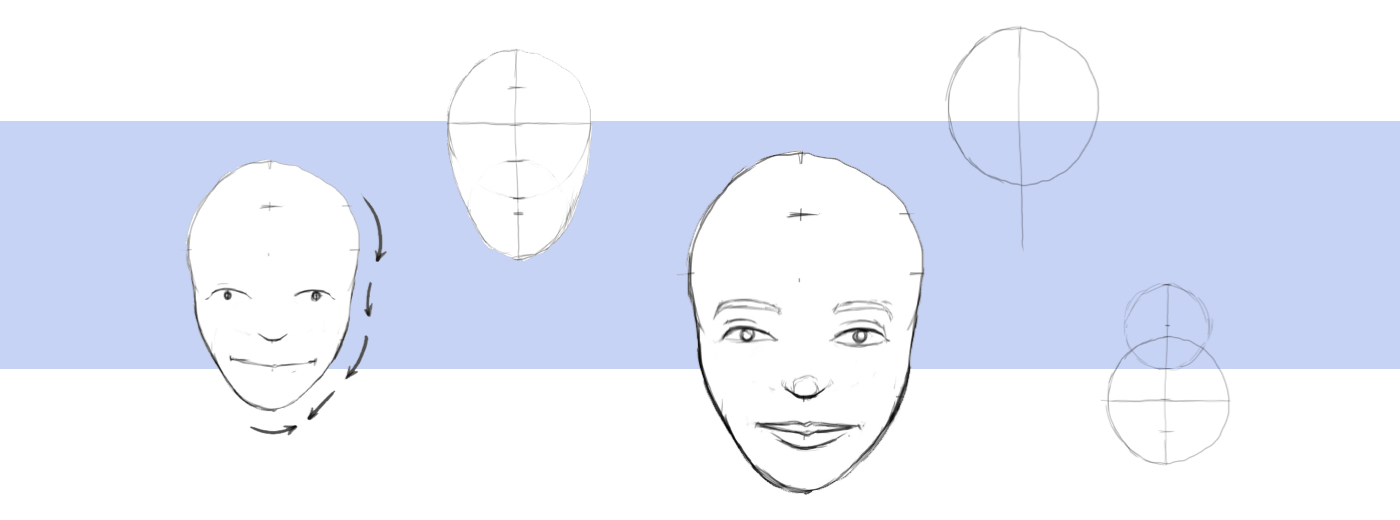
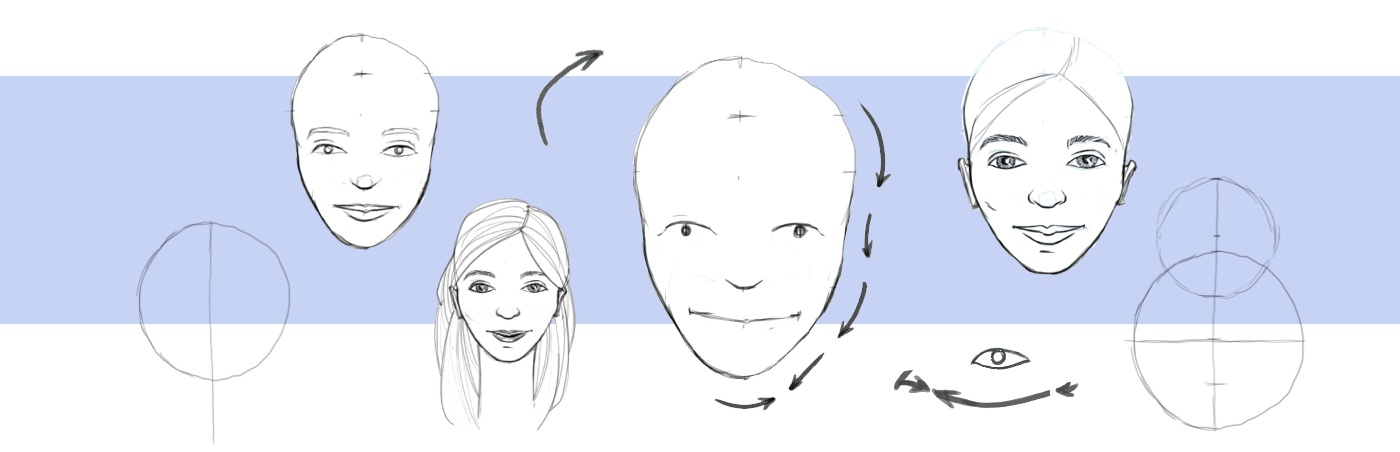
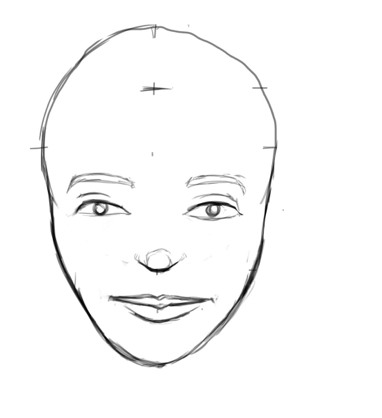
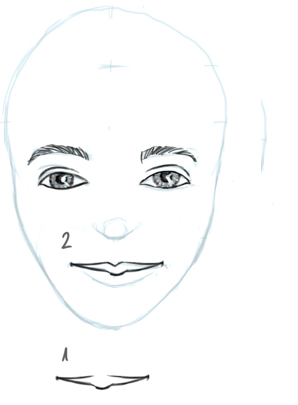
First, make a small construction drawing. With the help of some basic shapes, the head, eyes, nose and mouth can be positioned with ease.
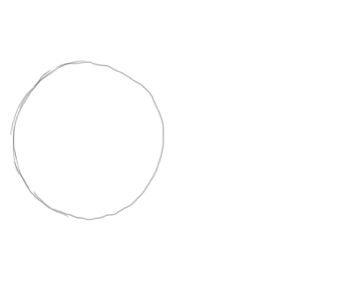
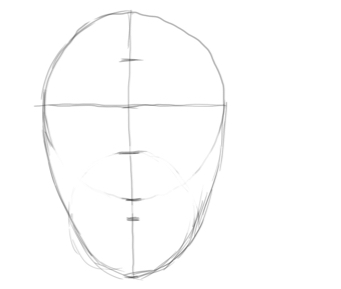
We start with a circle. Drawing a circle is not the easiest thing in the world. If you don't succeed right away and your circle looks like a cubist potato, try to fix your wrist and sketch the circle from the rotation of your forearm. You can also - like me - try to approach the circle shape with several quick strokes. Don't worry if your construction drawing doesn't look very nice. You won't see it at all in the end.
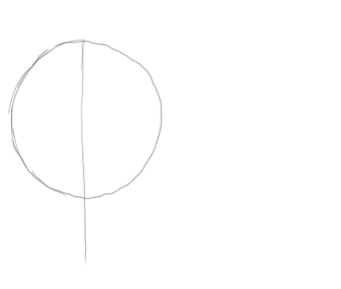
Now we sketch a straight line in the center of the circle. I call it "center axis", because left and right should be more or less symmetrical, as it is in faces.
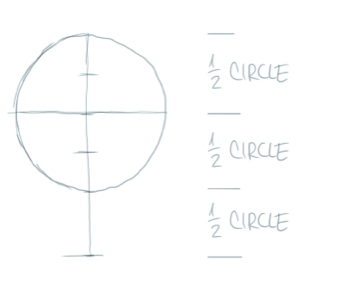
Time for some guidelines: Cut the circle with a horizontal line. We transfer this half circle height downwards to the extended central axis.
Within the circle, we cut each half in half again with two small lines. This way we have divided the circle into 4 parts and added another half circle height at the bottom.
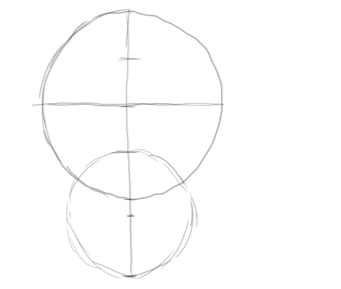
Now we need a smaller circle. Don't worry, we have almost finished construction. The small circle goes from the third line of division to the very bottom. So, it is ¾ as big as the big circle. We also mark the center of the smaller circle.
Construction finished. Time to draw the rest. Connect the two circles into a single shape. These joined circles will make up the skull and lower jaw as there are no bones sticking out, this should be pretty easy.
You can make the connecting lines straight or curve outwards, depending on how well nourished you want the face to look. The cheeks could also sink inwards if you want a gaunter look.
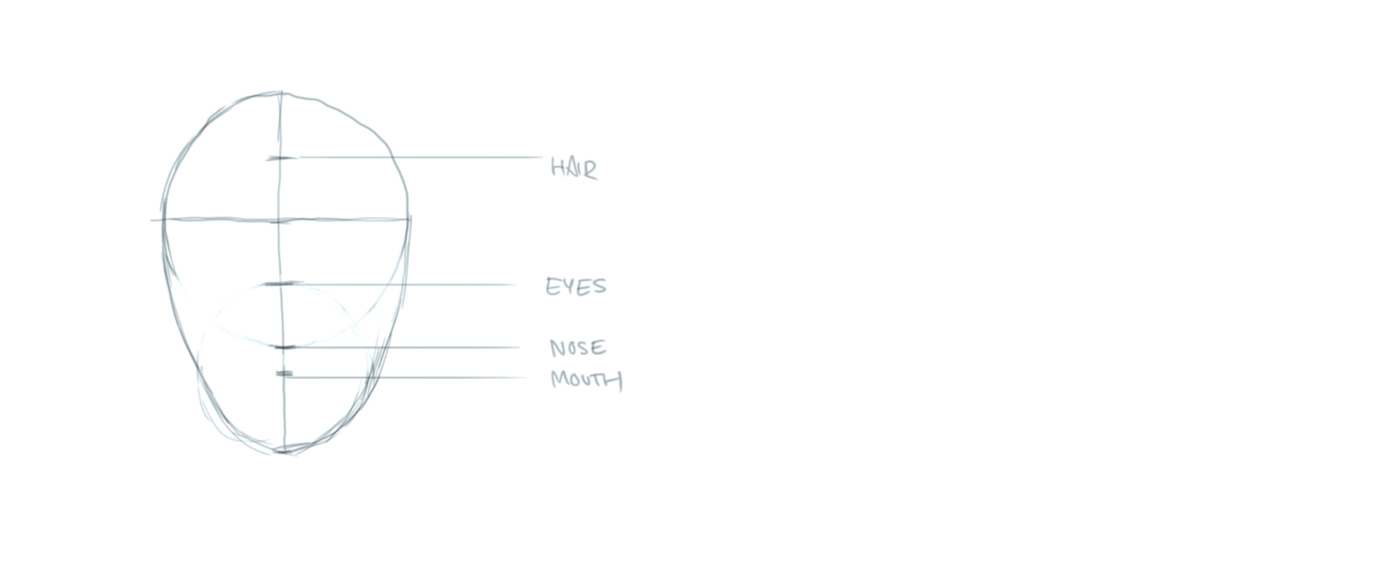
How good that we have constructed so bravely. Because now we know exactly where everything should be located:
• At the top quarter line is the hairline.
• The circle-middle line - well, maybe we could have left that out. But experienced artists know: to make a quarter, you have to make a half first
• The next line is for the eyes. Yes, they are really that low. They sit halfway down the face.
• The nose ends exactly at the lower edge of our first circle.
• And the mouth sits at the center of the small circle.
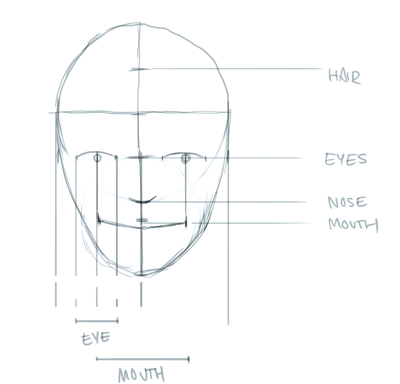
In order not to draw eyes and mouth too wide or too narrow, we subdivide the face once again, this time horizontally. We cut each side in half, then half again. This gives us a total of eight equally wide parts.
The left eye extends from the second to the fourth dividing line and the right mirrors it on the other side. The pupils sit in the middle of the eyes at the third subdivision line, exactly in the middle of each half.
The mouth is about as wide as the distance between the pupils. Sketch a pair of eyes, a mouth and a small U-shaped line for the nose. This doesn’t have to be perfect, but be sure to define the corner points clearly.
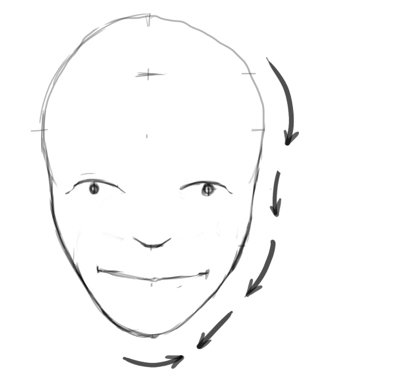
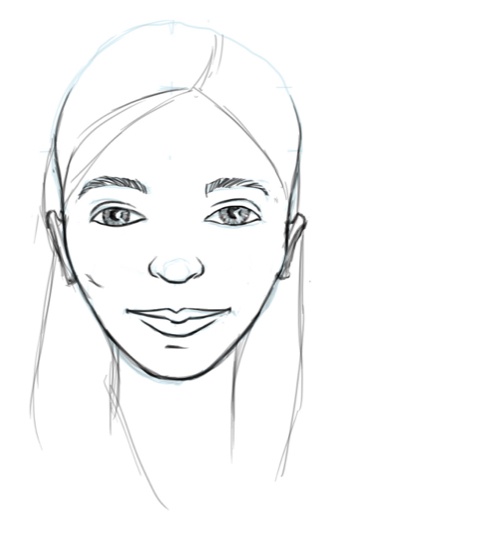
Now that we know where the eyes, mouth and nose are located, we can remove some of the guidelines. Keep the one for the hairline, we’ll need it again at the end. Now that we see the face for the first time, we can rework the head shape a bit. A woman's head shape is softer and less angular than males. Therefore, the outlines of the head shape should be drawn with softer curves.
We start with a U-shaped curve at the chin. Try to draw the chin as symmetrically as possible. The narrower the chin, the more feminine the face will look. But if the chin is too narrow, we might accidentally draw an alien.
When satisfied with the chin, start with a new line at the top of the forehead. First, follow the circle from our sketch. At eye level our head shape makes a barely noticeable dip inward. Once there, elegantly swing around the cheek and draw an almost straight line towards the chin, where our lines meet.

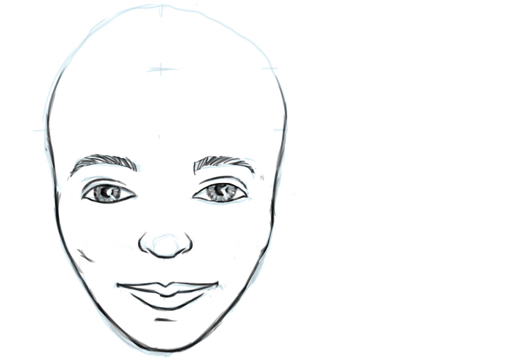
Now to decide what state of mind our woman's face has. This depends primarily on whether the eyebrows and mouth are pointing up or down.I have decided on a satisfied, good-humored face. The mouth points slightly upwards, the eyebrows are relatively neutral.
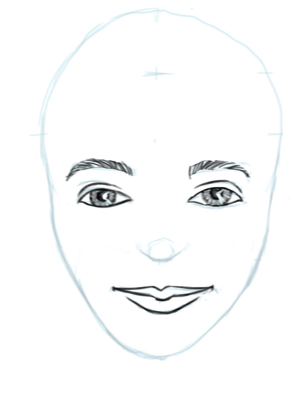
Our preliminary drawing is finished. I have indicated the areas for the eyebrows and sketched the lips a bit. But don't worry, we'll go into all the details right away.
In the next chapter we will take care of the details for our face.
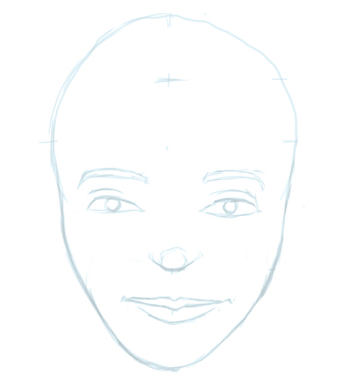
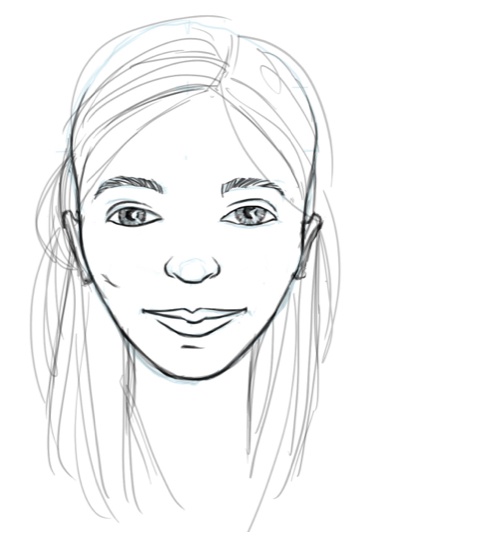
Place your preliminary drawing as a separate layer in the background and make it a little lighter so you can still use it as a guide, without it being too distracting.
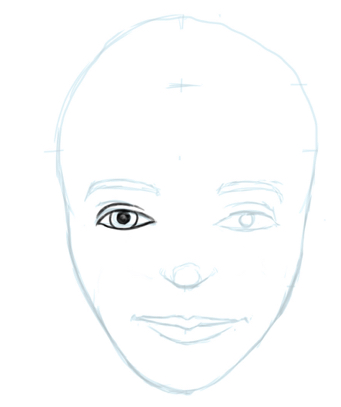
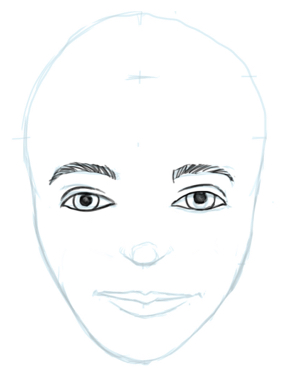
The shape of the upper eyelid varies from person to person. Even small differences have a great effect on the appearance of a face. Basically, the upper eyelid (especially the female eyelid) describes a curve that rises relatively sharply and then falls off weakly. The easiest way to achieve this curve is to start from the outside.
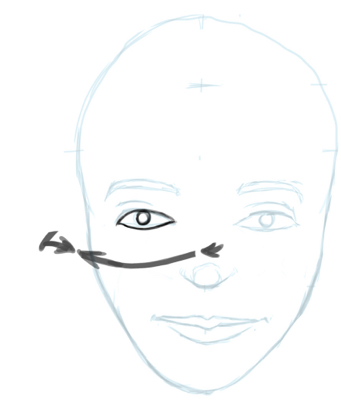
The lower eyelid describes a slightly flatter arc than the upper one. It does not start directly at the end point of the upper eyelid. The upper eyelid goes a little further outward. In addition, the lower eyelid can curve slightly upwards on both the outside and inside. In a laughing person, this outer curvature is particularly pronounced because the laugh muscles push the outer edges of the eyes upwards.
Depending on how important this facial characteristic is to us, we can draw this line several times.
Place the pupil so it lies against the upper eyelid. This creates the effect of the eye looking directly at us.
The upper lid crease is the most romantic crease of the face. Eyelid wrinkles that touch the upper eyelid at certain points create different effects. For example, exaggerated, high eyelid creases create the well-known bedroom look. It is worthwhile to experiment with the upper eyelid crease, as it can express completely different moods.
The standard eyelid crease, when the eye is at rest, runs almost parallel to the upper eyelid. Since things are rarely exactly parallel in nature, the eyelid crease can move slightly away from the eyelid towards the middle of the line and approaches the middle of the face again.
Geometrically, the iris is a circle concentric to the pupil. It is about half as wide as the total area of the eye. Of course, we do not draw a complete circle, because the iris is covered by the eyelids at the top and bottom. It may be easier to draw a complete circle for the iris first, and to remove the covered parts after.
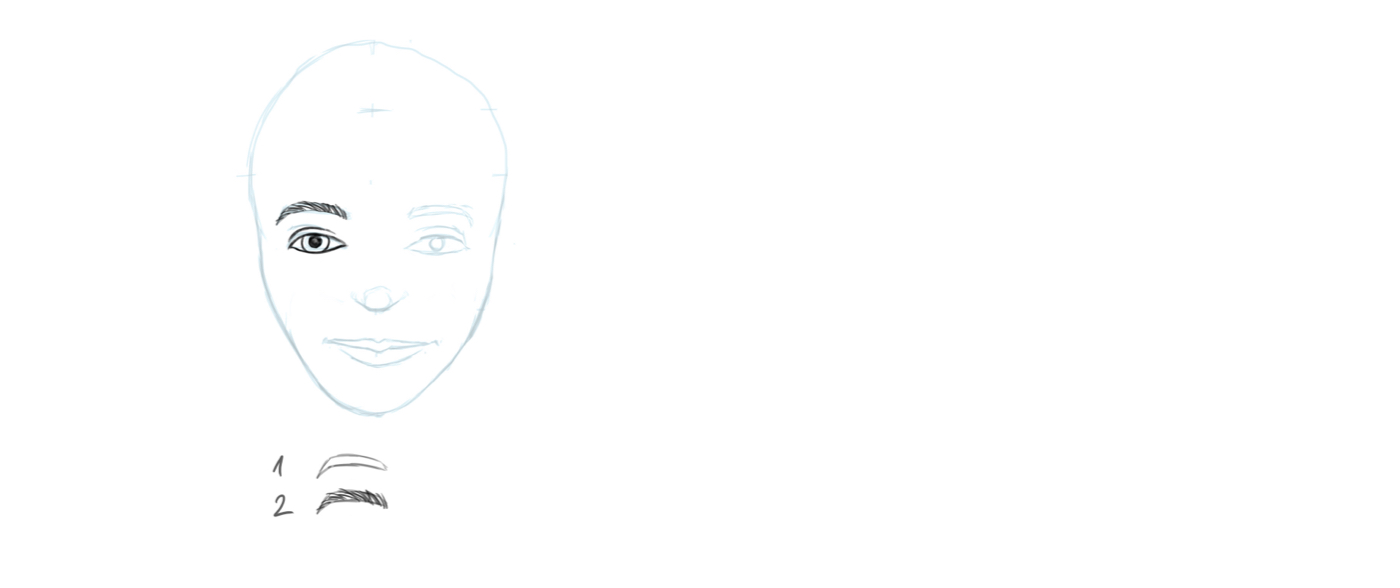
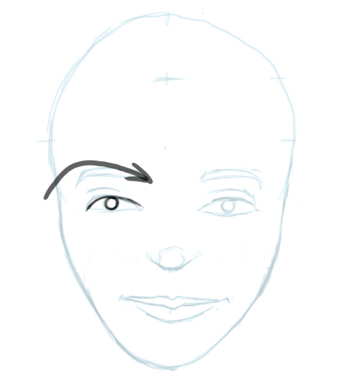
For the eyebrow, sketch an area which to fill with hair afterwards. This area is rather pointed towards the outside. Female eyebrows tend to be a little narrower than those of men and can have a steeper arch. But be careful - this can appear severe.
The hair of the eyebrows starts inside at a 45-degree angle and becomes flatter towards the outside. It’s best to draw the hair with lots of fast strokes. Start on the inside, and draw each hair at a slightly offset angle.
In this digital age, hair that protrudes too much can be easily erased using a pen tablet.
You can also copy and even mirror things on your tablet. However, there were eyes and faces long before the digital age. And no two eyes ever look exactly the same. And last but not least: You have to practice!

The eye and especially the iris are complex structures, made of many fine shapes and colors. We can approach this view graphically by drawing many fast alternating black and white fine lines from the pupil to the edge of the iris. We can also fill the iris with color later.
The final touch is given to the eye by light reflection. This can be a simple white point, several points, a window or even a whole landscape. We achieve a pleasant effect with a simple shape that does not cover too much of the eye. We do not want to illuminate the whole eye. Less is more.
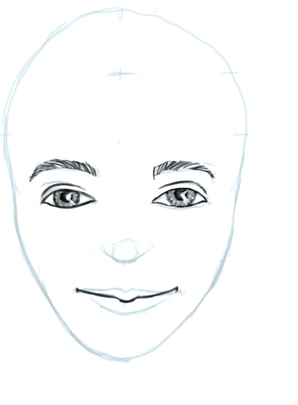
The mouth is not a gently running line. The corners of the mouth, i.e. the outer edges of the line should be defined with a little more pressure or with small corner creases. A typical feature of the female mouth is the small curvature of the mouth crease in the middle.
I made the mouth a bit narrower than in the preliminary drawing, because it seemed more coherent to me.
Don't forget to always look at your drawing as a whole and check if everything is in its place. Maybe you want to change something? What can be improved?
Male and female faces also differ in the thickness and curvature of the lips. We start the upper lip as symmetrically as possible with two slightly ascending, quickly drawn strokes
from the corners of the mouth towards the middle. In the second step, we let the two strokes turn into a V with two steep curves.
The lower lip may be slightly thicker than the upper lip, but this is not a must. The line may become slightly flat towards the middle.
The mouth may end up looking a little like a sticker stuck on the face. To prevent this, just use a little drawing trick. Leave a gap between the lower lip line and the corners of the upper lip, let the line gently run out and point towards the corners of the mouth.
The nose is known to protrude furthest from the face. This may be a little easier to draw in profile, but in the frontal view it presents us with certain difficulties. As we only have two dimensions at our disposal, we have to work with something called ‘perspective shortening’. This can be a challenge especially for beginners, but we can avoid any problems by applying a simple formula: Draw the tip of the nose as a small horizontal line pointing slightly upwards. On both sides of the tip of the nose we continue with slightly outwardly curved strokes.

The nostrils start very close to the outer sides of the nose tip. They are almost horizontal at the lower end and point at the upper end in approximately the direction of the opposite inner eye fold.
Now we should check the face as a whole. Is the nose too large or too small? Too wide? Too narrow? You can change the nose until you are satisfied. Most graphics programs can also help you with the transformation tool.
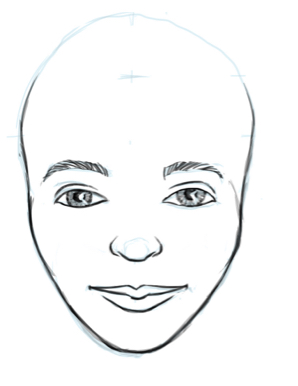
Now that we have drawn all the important parts of the face, it is advisable to adjust the head shape one last time. In principle, we can transfer the head shape from the preliminary drawing to the final drawing in pretty much the same way. You may notice some spots that need changing slightly.
Among many possible shadows and wrinkles that faces could have, I have chosen two that I like to use, especially on female faces.
One is the chin crease under the lower lip. It defines the chin and visually widens the mouth area.
Another is the cheek shadow (on the left). This is one of the typical features of a woman’s face. It usually takes a few tries to get the cheek shadow where it should be, so that the face doesn't look too bony or grinning.
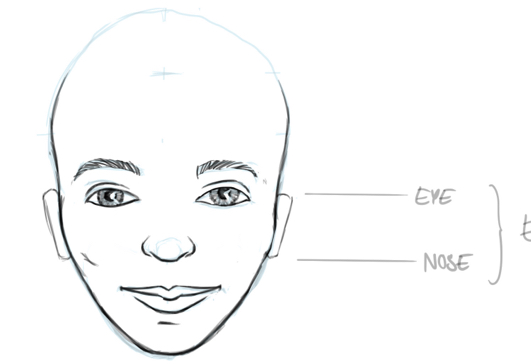
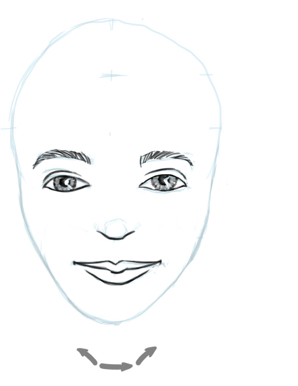
Once again, this step is about determining a position. The ears stretch from the eyes to the tip of the nose. As we see the face from the front, the ears don’t appear round, but almost flat against the head. Draw two small, slightly V-shaped boxes.
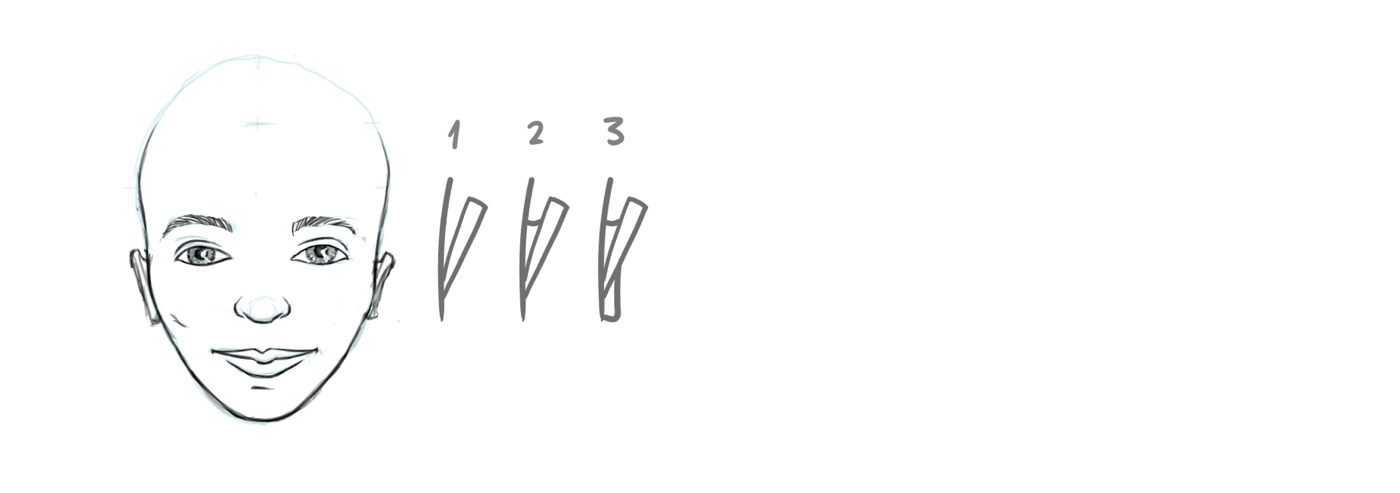
One of the great advantages of the female face is that there is usually a lot of hair covering the ears, so we may not even have to draw them. The ear is a rather complicated structure with many angles, wrinkles and shadows and should probably be described in more detail in a separate course.
I have therefore indicated in the picture how to draw a somewhat abstracted ear in three simple steps. The two boxes help us to do this.
In the next chapter our face will get hair and final touches, including color.
Hopefully you haven't erased the little hairline guide. If you have, don’t worry, we can position the hair by observing the rest of the face.
Hair, like ears, is a science in itself and basically needs its own tutorial. But I will limit myself to a few lines to describe it.
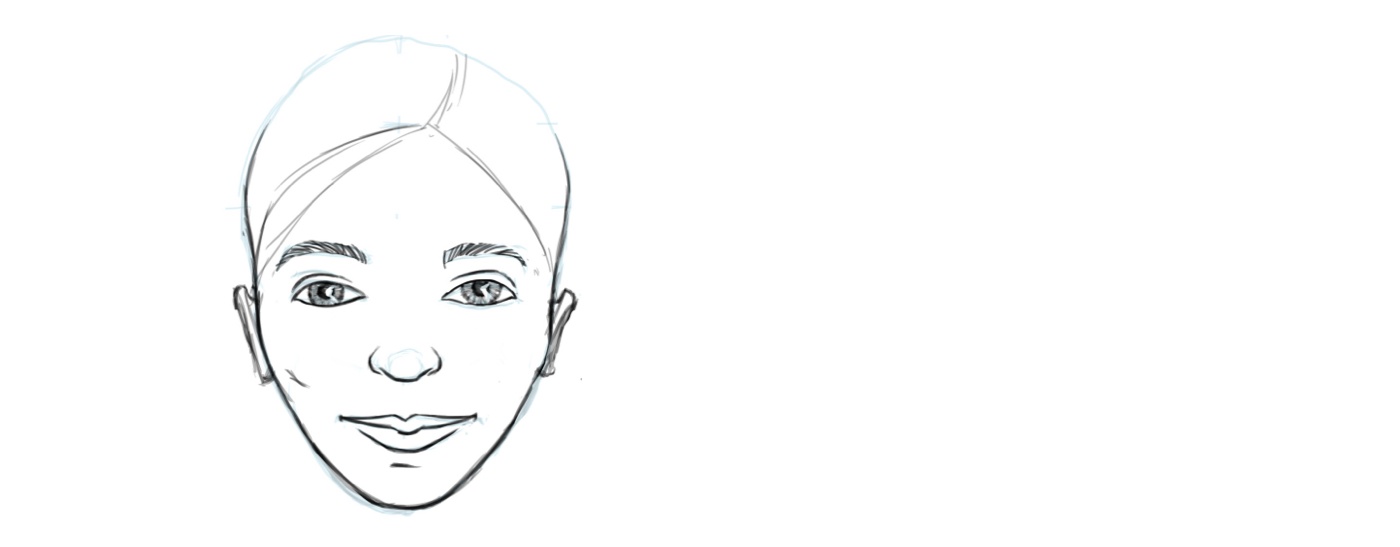
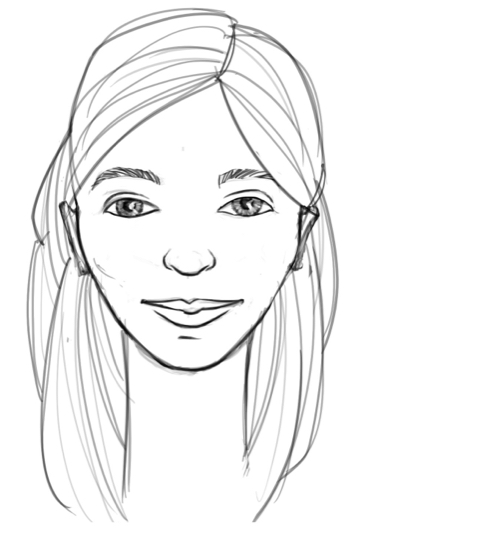
We start with a rough sketch of the vertex and outer edges of the hairstyle. It's best to draw this on a separate layer, so that we can easily hide the preliminary drawing of the hair later. The line for the parting runs from the hairline auxiliary line - here a little to the right of the center - in an upward sweep that is as elegant as possible. From the vertex, the hair falls towards the ears on both sides. Depending on how loose the hairstyle should look, several lines running side by side can also limit the hairstyle.
Below the ears the hair reappears and falls down freely in several brisk strokes. On this occasion we can also indicate the neck.
While drawing the hairlines you will notice certain curves, curls or areas that you’d like to add to. Don't go into too much detail yet.
This step is not about drawing slow cautious lines, but about drawing the hair in a sweeping and brisk manner. Of course, we don't draw every single hair, but rather study the fall directions of the hair at the different places. Later we can define them with a few clear strokes. Hair grows in tufts, and within these tufts it all grows and falls in similar directions (not criss-cross). I've created several tufts of hair and hairstyle areas in the image quite arbitrarily. There are no limits to your imagination. Hair is always the fun part.
Once your hand gets used to the fast movements, lines, and curves of the hair strokes, it is much easier to define a clear, sweeping hairstyle. For the final drawing of the hair, it is recommended to use a separate layer again. Here we can orientate ourselves on the pre drawn hairstyle and later, as already mentioned, simply hide it. If necessary, we can also erase hair that is too long and protrudes into the face without erasing the face itself. It's worth experimenting with different line widths and degrees of coverage when drawing the hairstyle. In our picture I have emphasized the individual strands with a darker line, while within the strands the indicated subdivision lines are much lighter and less prominent. The most important thing when drawing hair is still the line speed. And fortunately, in digital drawing, any imperfect stroke can be undone until it fits.
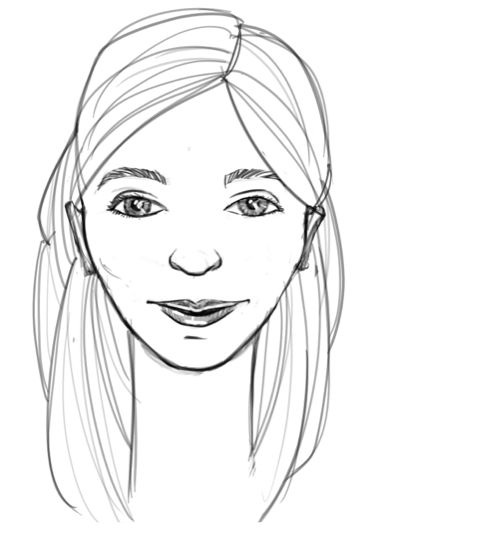
Of course, the possibilities for detail work are almost unlimited. Here are a few examples that can be fun:
• Adding another point of light in the eye.
• Texture the lips with the same technique as the iris.
• Adding a subtle shadow at the bottom of the nostrils.
I hope you had fun and found some helpful tips for your future drawings. Of course, you can't cover all aspects of a creative topic in a single tutorial.
We will go into more details and variations in future courses, such as: How to draw a face from different perspectives, Faces of different ages, Hair - nose - ears in detail, Coloring of faces, Other parts of the body, Hands - feet - body, and The male face, etc.
This tutorial is designed to provide a solid foundation on which any aspiring artist can build. As in any art form, the results depend on regular practice. Don't be frustrated if you don't like your first drawings. You will get better with every painting. Stay tuned, get inspired and have fun with it.
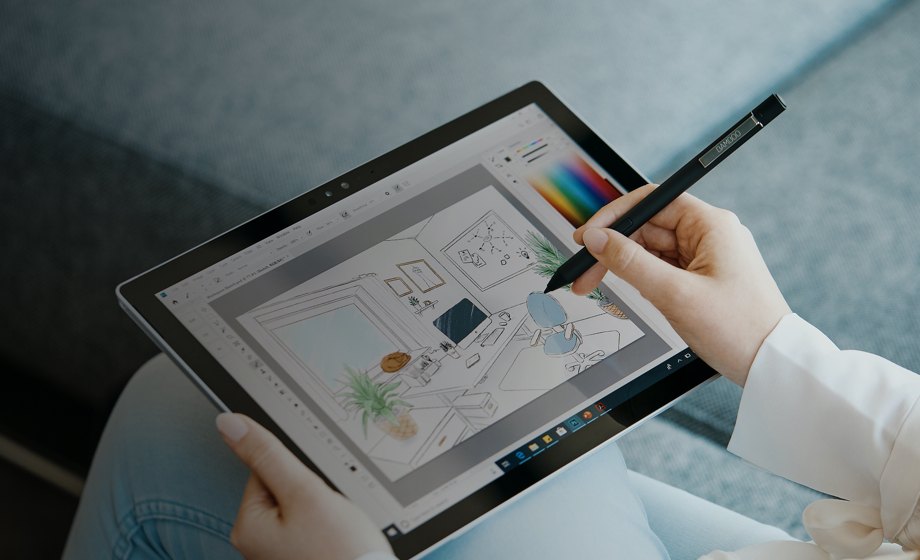
Wacom One is ideal for bringing facial features to life. The natural surface friction and minimal reflection creates a pen-on-paper feeling on the 13.3” screen. The pen feels light and natural in your hand and transforms into a pencil, paintbrush or chalk in your selected software. It can even be used as an eraser. Perfect for refining the details to create lifelike faces. Creative software comes included, along with the ability to connect to your Mac or PC, as well as certain Android devices.
Recommended product

Wacom One 13 pen display
Draw, design and create directly on a high resolution screen with a precise pen.
Sketch, draw and edit images with a responsive pad, a precise pen and see your creations appear on screen.

Draw, design and create directly on a high resolution screen with a precise pen.
Wacom’s vision is to bring people and technology closer together through natural interface technologies. This has made it the world’s leading manufacturer of interactive pen tablets and displays as well as of digital styli and solutions for saving and processing digital signatures. The advanced technology of Wacom’s intuitive input devices has been used to create some of the most exciting digital art, films, special effects, fashion and designs around the world and provides business and home users with their leading interface technology to express their personality. Founded in 1983, Wacom is a global company based in Japan (Tokyo Stock Exchange 6727) with subsidiaries and affiliate offices around the world to support marketing and distribution in over 150 countries.