Pen tablets
Sketch, draw and edit images with a responsive pad, a precise pen and see your creations appear on screen.

Benvenuti al tutorial su come disegnare gli occhi. Come sempre, non c'è un unico metodo per disegnare una cosa. Ma si possono seguire alcuni consigli e trucchi molto utili per sviluppare e migliorare la propria tecnica e il proprio approccio. Ho riepilogato qui il maggior numero possibile di consigli e cercherò di spiegarli nel modo più piacevole possibile.
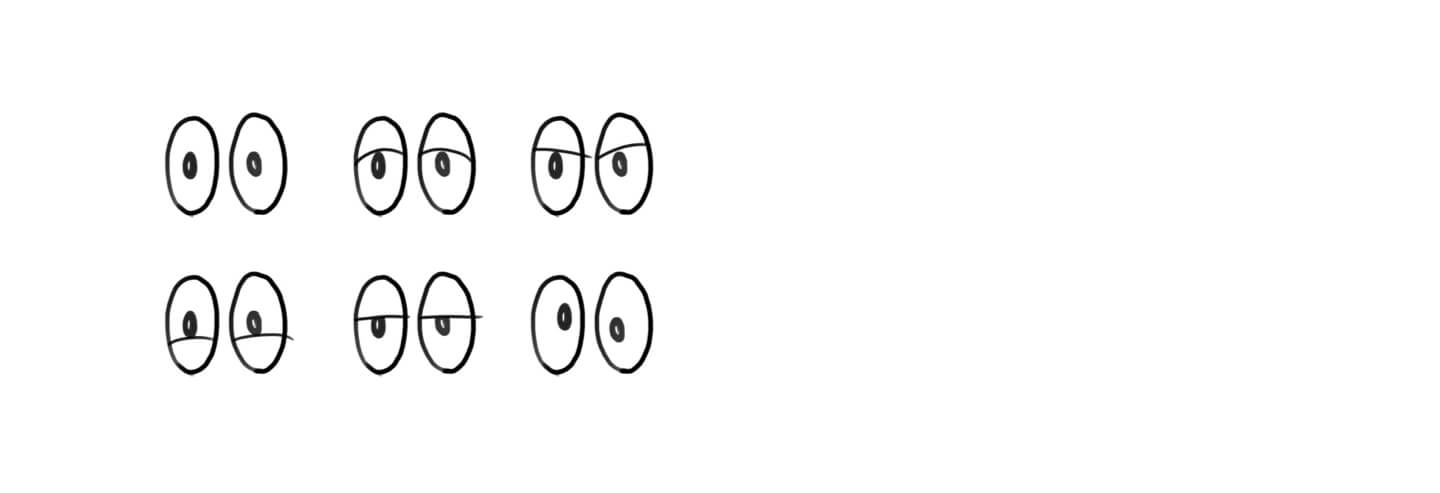
Chi disegna un volto spesso inizia con due punti o due tratti per gli occhi che, dopo alcuni tentativi, diventano probabilmente due cerchi, ognuno con un punto al centro. In realtà, questa rappresentazione astratta delinea con precisione quello che sono gli occhi: due sfere, ognuna con una pupilla che indica la direzione dello sguardo. Come passo successivo, noi intrepidi illustratori sentiamo l'esigenza di esprimere delle emozioni attraverso gli occhi. Quindi aggiungiamo una palpebra superiore nel cerchio dell'occhio. E presto ci accorgiamo che le palpebre rivolte verso il basso tendono a sembrare arrabbiate o cattive, mentre quelle rivolte in alto tendono ad apparire tristi o umili.
Questo metodo basilare di raffigurare gli occhi è ormai diventato un classico nei cartoni animati, nei fumetti e nell'animazione e il motivo è che permette di esprimere una vasta gamma di emozioni. E, osservando attentamente, risulta evidente che i disegnatori di cartoni animati curano molto la forma degli occhi, anche quando a prima vista può sembrare che scelgano un tipo di raffigurazione semplice. Teniamolo presente mentre esploriamo i prossimi punti.

First, let's try to understand the actual structure of the eye. Understanding the structure doesn't mean that every drawing has to have all the details of the eye. You will need to decide for yourself which details you want to emphasize, and which aspects you want to leave out. Your own style will develop out of these choices.
But now to the structure of the eyes:
As we know, the eye is a ping pong ball sized sphere sitting inside the head. So, let's get started by drawing this sphere. By giving the sphere horizontal and vertical axes, we show that it is not merely a circle, but a 3-dimensional sphere that is, in this case, turned slightly to the left and up. When you draw in the two axes, make sure that they are ellipses that end at exactly half the height or half the width of the circle.

Viewed from the front, the iris is about half the size of the whole eyeball. The size of the pupil varies from person to person, and it also depends on the light situation and the mood. In addition, the iris is not painted flat onto the eyeball. Rather, it is raised a bit like a contact lens would be. When we draw an eye from the front, we don’t need to worry about this detail. But, the farther the eye is turned, the more prominent this iris “bump” becomes. Technically, the pupil is not actually a black dot, but a small hole through which light enters the eyeball. It is centered behind the iris lens, instead of on top of it. That's why when an eye looks to the side, you’ll move the pupil a little bit towards the center of the eye.
The picture shows the eye turned in three directions. Notice what happens to the iris and pupil:
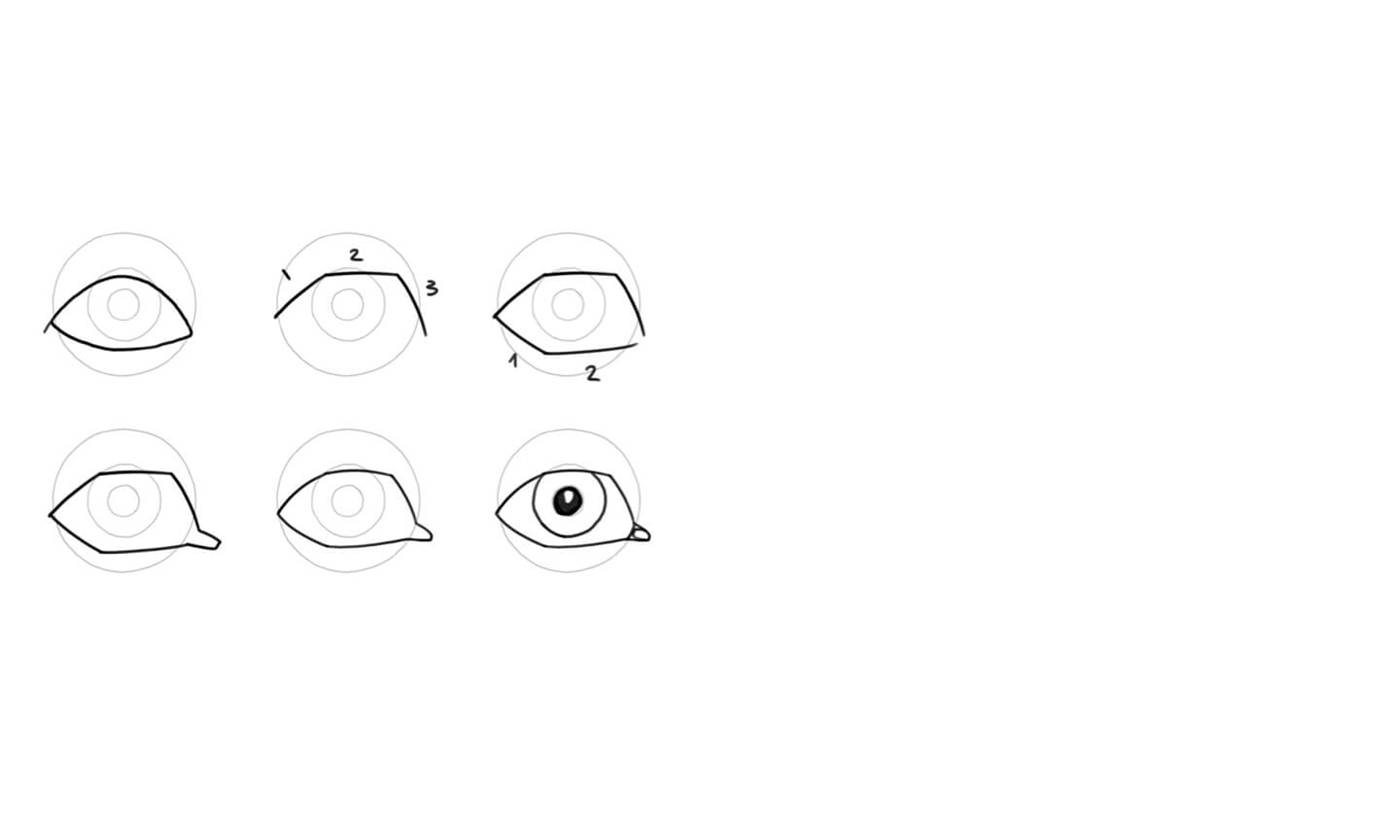
Esaminiamo la forma di quello che noi artisti chiamiamo effettivamente "occhio". Quello a cui in realtà ci riferiamo è l'apertura attraverso la quale si vede una parte del bulbo oculare, ossia lo spazio fra i bordi delle due palpebre. In linea di massima, i bordi delle nostre palpebre hanno la forma di due U appiattite rivolte internamente l'una verso l'altra. Osserviamo un po' più da vicino queste due U.
Anche i disegnatori esperti si concedono spesso qualche istante per creare mentalmente un progetto prima di tracciare la linea della palpebra superiore con un'abile pennellata. Questo perché basta anche solo una lievissima deviazione dalla linea per trasformare completamente l'espressione del volto. Questo trucco ti aiuterà: dividi la palpebra superiore in tre sezioni. (Il trucco di dividere le linee difficili in varie sezioni non vale solo per le palpebre: qualsiasi linea può essere abbozzata in questo modo). Si può dividere anche la palpebra inferiore.
Ma in questo caso è meglio usare solo due tratti invece di tre. Per qualche misteriosa ragione, l'occhio finisce per risultare più dinamico se dividiamo la palpebra superiore in tre e quella inferiore solo in due parti. Alcuni artisti procedono nel modo inverso, con due tratti in alto e tre in basso. Fai le tue prove.
Nella sezione centrale dell'occhio, qui sulla destra, vedrai il cosiddetto condotto lacrimale,
che varia da un volto all'altro e a volte non c'è nemmeno.
Ora che abbiamo abbozzato la forma dell'occhio, possiamo arrotondare un po' gli angoli delle linee divisorie o provare a disegnare le due linee delle palpebre con due pennellate nette.
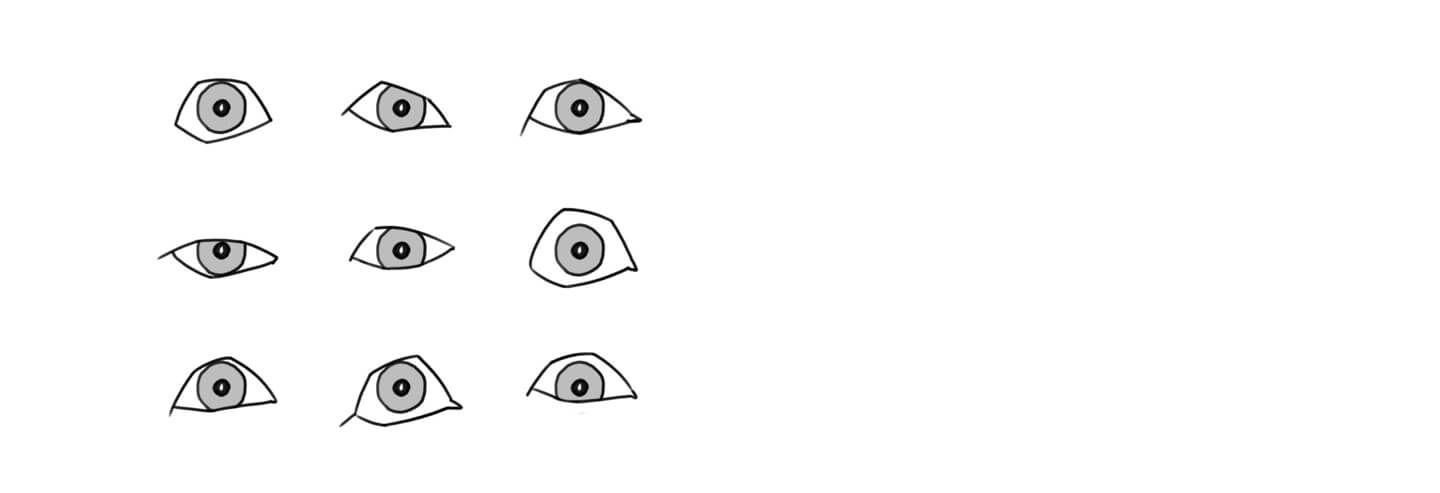
Questo sistema a cinque linee offre numerose possibilità di variazione. In base al rapporto fra la lunghezza e l'angolazione delle linee, puoi creare tipi di occhi molto diversi che esprimono un'ampia gamma di stati d'animo. Ovviamente queste linee servono principalmente per costruire una struttura preliminare e sta a te scegliere lo stile con cui vuoi proseguire per i tuoi occhi. In ogni caso, il sistema a cinque linee può rappresentare un accorgimento stilistico davvero interessante.

Next, we should keep in mind that the two eyelids have a certain thickness too. On one hand, this makes the eyelids to protrude from the face a little farther than the eyeball when viewed from the side. On the other hand, a narrow edge will be visible all the way around, almost parallel to our 5 lines from before. If you might want to draw a crying eye at some point, you might be interested to know that tears collect on the narrow ridge of the lower lid. Neither area is always visible – it depends on whether we are looking at the eye from above or below, and on what the eye is doing.

The eyes – including the eyelids – can be constructed from every conceivable perspective in this way. Start with the sphere and imagine the eyelids wrapping around the sphere. Use the 5 lines to work out your basic shape. You will need to adjust the lengths and angles of your 5 lines depending on perspective. In some perspectives you may only need 2 or 3 of the lines because the rest are hidden behind the eyeball itself (e.g. in profile). At which points does the narrow area of the eyelids become visible? Which of the lines do you want to emphasize, which can be ignored? We will get into this in more detail below as we position the eyes on the face.

Now that we know all sorts of things about the eyes themselves, let's try to fit them into different headshapes. If you can already draw the headshape from different angles, then great! If not, I’d highly recommend the previous tutorial on "How to Draw a Human Headshape". I'll be using the same headshapes from that tutorial. These heads are a very handy starting point, but you don't necessarily need them.
In order to define the eye area, I like to start with the small, almost triangle-shaped area above the nose. As you can see, the triangle shortens when the head is looking down and lengthens when looking up. In profile, The triangle seen from the side simply becomes a line.
By the way, when you draw the triangle onto your headshape, you can use the guides at the center-line of the headshape for easy orientation.

Next, and very simplified, we want to define the shape of the bones around the eye, because they are very important. They protect our eyes from blows and soccer balls. ;) The easiest way to define the bones around the eye is to use the Batman mask. Our triangle serves as a starting point here.
Just like our eyelid construction, the Batman mask consists of 3 lines at the top and 2 at the bottom. Each of the outer edges meets the cut out areas of our headshape exactly. When you transfer the Batman mask onto the tilted heads, notice what happens to the angles, and which lines appear shortened. In profile we can see only part of the mask, of course.

The eyeballs are obviously not glued onto the front of the face. Instead, they are located quite deep inside our head. Therefore, in placing our spheres into the Batman mask, we have to offset them a bit. How big the offset depends on the perspective. You can see this particularly clearly with the head tilted up. In profile we see this very easily. From the front, the depth of the eyeballs isn’t visible at first.
There is no general rule about how far apart the two eyeballs have to be. But if you are not sure, just think of a third sphere (or a little more) between the two eyeballs. This will give you a good distance.

Never underestimate the importance of what we learned earlier about the pupil and iris. Even a tiny bulge in the iris can enhance the realism of your eyes. From the front of course, you don't need to embellish. But as soon as the eye is not looking straight on at the viewer, remember to curve the iris and the deepen pupil.

Now let’s get to the eyelids. First, mark each of the two outer edges of your eyes level with the headshape guide lines. Then, draw in the pentagon. If you have already constructed the spheres neatly, everything else almost draws itself. Here again subtle changes to the angles and lengths on the sides can be made depending on how you’re viewing the headshape. When the views are pushed to extremes, the pentagon might also form interior angles, such as here in the picture with the two heads looking up and down respectively. In profile, the iris covers half the pentagon.

The second eyelid line is a nice way to emphasize the perspective you decided to depict the face from. Pay close attention to which parts of the narrow eyelid surfaces are facing the viewer. They will be thicker than the others. For example, with the head looking up, only the upper eyelid is visible. But then with the head turned to the side, different areas of the eyelid surfaces become visible around each of the eyes.

The two eyelid creases are the boundary between the eyelid and face. The upper crease in particular lends your eyes increased depth. Here, you can use the sphere as a guide. It's also worth holding on to the subdivisions from the eyelid design at this point. If you don't want your face to look old or tired, draw the lower eyelid crease a little softer and shorter than the upper. You can even hint at it just slightly.

Eyebrows tend to express the mood of your face very clearly. In a neutral, resting state, the eyebrow starts at the top of the triangle, rises slightly, and then tapers down again. The edge of the eyebrow is again the cut out areas like in the original headshape design.
It's best to define the shape of the eyebrows with outlines first. This will simplify later steps. You can also indicate the direction of hair growth with small lines within the brow shapes. Start in the middle with steep lines, and flatten them out closer to the edges.

We can now finally harvest the fruits of our labor. From here on, your own style input is necessary. Every draftsperson has their own unique lines and handwriting. Maybe you’d prefer a more sketchy style, or maybe you want to start working with surfaces or colors straight away. Naturally, this is entirely up to you. From this point on, you have a ton of opportunities to develop your image. But since we're not talking about different styles or coloring in this tutorial, let's develop our eyes using entirely clean lines.
As you can see, the two upper eyelid lines can also be combined into a single thick line. This is especially true if you want to create a shadow. For the lower eyelid, it's a good idea to use the outlines a bit more sparingly, because usually shadows do not occur here when the light source is from above.

For the iris and pupil, I am going to give you a simple (but very effective) solution when using a graphic tablet: Reduce the opacity of your brush to about 30% in order to paint the iris. This is easier if you use a brush that is just a touch smaller than the iris itself. Next, let’s give the iris a little sparkle by reducing the brush size and hardness to lighten the center of the iris with white. Now you can fill the pupil in black. Of course, make sure that you offset it a bit from the center of the iris, depending on the view angle. Now you can use white again to set a light reflection point. Preferably, this will be slightly offset from the pupil. It doesn't always have to be a dot. You can experiment with different shapes. To add a final touch to the iris, show the shadow on the upper lid that it casts on the iris. And if you like, you can also throw in a little more detail to the structure of the iris by drawing (preferably on a separate layer) subtly alternating black and white lines from the pupil to the edge of the iris. But – just little tip – only make this effort if the eyes you are drawing are actually big enough to be able to notice this level of detail.

Le sopracciglia possono spaziare da semplici forme disegnate sul volto fino a rappresentazioni molto realistiche. Per creare quest'ultimo effetto, puoi usare lo strumento "sfumino", procedendo sempre nella stessa direzione in cui crescono i peli, in modo che i bordi netti delle tue forme si trasformino in una linea sottile a zigzag. Fai attenzione a non rendere gli zigzag troppo uniformi fra loro e nemmeno troppo disordinati. Una volta soddisfatto del risultato, schiarisci un po' gli zigzag e completa le sopracciglia con dei peli. Lo stesso delicato equilibrio fra ordine e caos si applica ai peli. Disegna i singoli peli con tratti più rapidi possibili. È meglio usare linee leggermente ricurve che si assottigliano e cambiano spesso direzione, facendo comunque attenzione al senso di crescita dei peli delle sopracciglia.
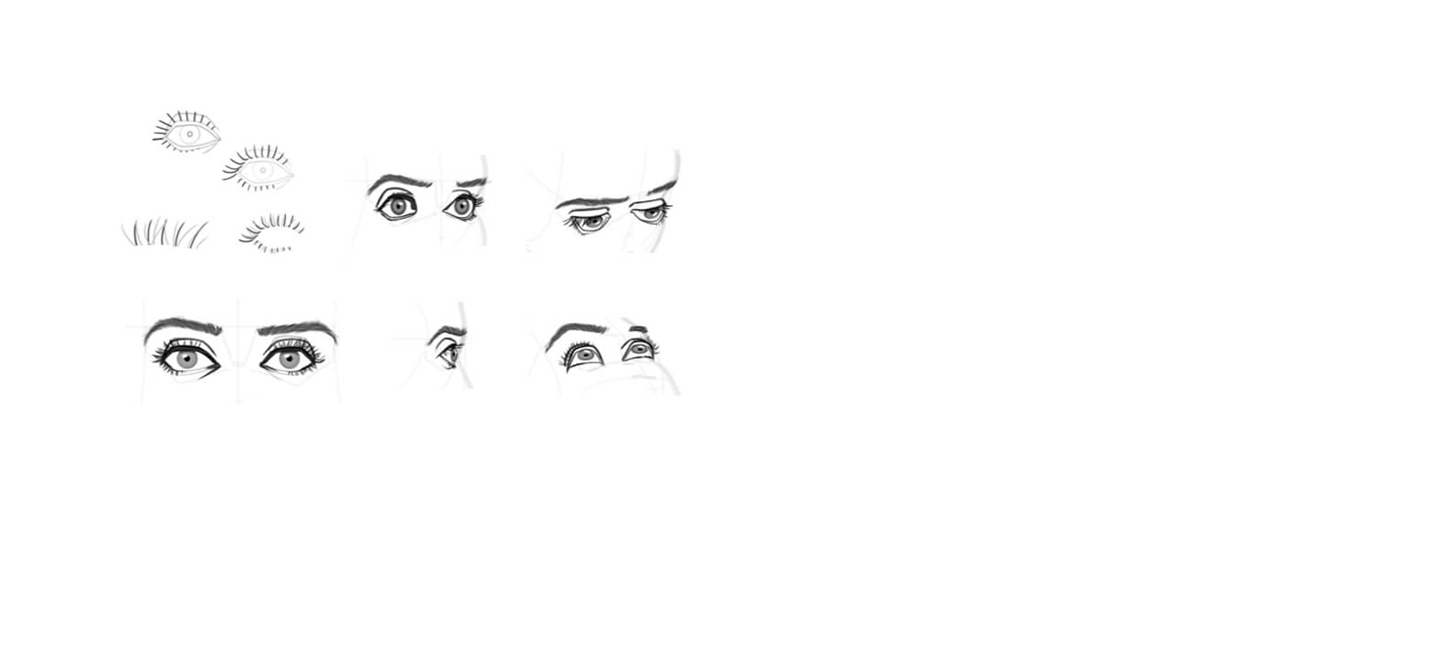
Come ultimo punto, ma non meno importante, arriviamo a una piccola sfida. Le ciglia necessitano in genere di un paio di tentativi e di un po' di pratica. Qualche consiglio potrebbe semplificarti la vita: le ciglia crescono sulla seconda linea della palpebra (quella esterna). Tendono a essere più lunghe verso l'esterno dell'occhio. Le ciglia inferiori sono più corte di quelle superiori e verso il centro diventano in genere abbastanza sottili, quasi invisibili. Inoltre, le ciglia sono sempre curve. La direzione di questa curva è basata sulla tua prospettiva della curvatura dell'occhio. Questo significa che la curva diminuisce verso il centro dell'occhio e che le ciglia si curvano in direzioni opposte sui due lati dell'occhio. Potrebbe sembrare complicato, ma in realtà è piuttosto semplice da capire guardando l'immagine.
Quando si disegnano le ciglia, può essere utile usare un procedimento a due fasi: per prima cosa, disegna solo una decina di ciglia per ogni palpebra. Assicurati soprattutto di curvare le ciglia con l'angolazione giusta. Fai anche attenzione alle lunghezze e fai in modo che si assottiglino come i peli delle sopracciglia. Nella seconda fase, usa gli spazi fra le prime ciglia per inserire le "ciglia caotiche" (raffigurate qui in grigio). Varia leggermente la lunghezza e la direzione delle curve e ogni tanto fai sì che alcune ciglia si uniscano a formare dei piccoli ciuffi.
A seconda di come giri la testa, la direzione delle ciglia cambierà. Questo potrà richiedere qualche istante di riflessione su come organizzare gli spazi. Prenditi il tempo necessario. Pensa bene dove devono puntare le ciglia.

Questo ci porta alla fine di un tutorial impegnativo. Non occorre che assimili e applichi subito tutto quello che abbiamo fatto qui. Ma in questo tutorial troverai praticamente tutti i consigli che ti servono per disegnare degli occhi. Almeno uno o due li userai sicuramente!
Buon divertimento nel disegnare e a presto!
Avviso spoiler: nel prossimo tutorial, alcuni degli occhi che abbiamo appena creato con tanto impegno spariranno dietro il naso.
Wacom One creates a familiar pen-on-paper feeling, thanks to a 13.3” screen with natural surface friction and minimal reflection. The pen feels light and natural in your hand and transforms into a pencil, paintbrush or chalk in your selected software. All you need for drawing realistic eyes. Creative software comes included, along with the ability to connect to your computer, as well as certain Android devices.
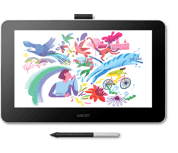
Wacom One 13 pen display
Draw, design and create directly on a high resolution screen with a precise pen.

Sketch, draw and edit images with a responsive pad, a precise pen and see your creations appear on screen.

Draw, design and create directly on a high resolution screen with a precise pen.


L’idea di Wacom è quella di avvicinare persone e tecnologia attraverso tecnologie naturali. È questo che l'ha resa leader al mondo nella produzione di tavolette con penna e display interattivi, penne digitali e soluzioni per il salvataggio e l'elaborazione di firme digitali. La tecnologia all’avanguardia dei dispositivi Wacom è stata utilizzata per creare alcune delle più emozionanti opere d’arte digitali, film, effetti speciali, moda e design del mondo. La sua tecnologia ad altissimi livelli consente sia ad aziende che a privati di esprimere la propria personalità. Fondata nel 1983, Wacom è un’azienda internazionale con sede in Giappone (Tokyo Stock Exchange: 6727) e uffici in tutto il mondo a supporto del marketing e della distribuzione in oltre 150 paesi.